Easter Rocky Road

Easter rocky road

When I was a child, we had an Easter tradition. Every year we would crush Shredded Wheat, mix it with melted chocolate and form it into nests. They were finished off with mini chocolate eggs and taken into primary school, where they were always received well.

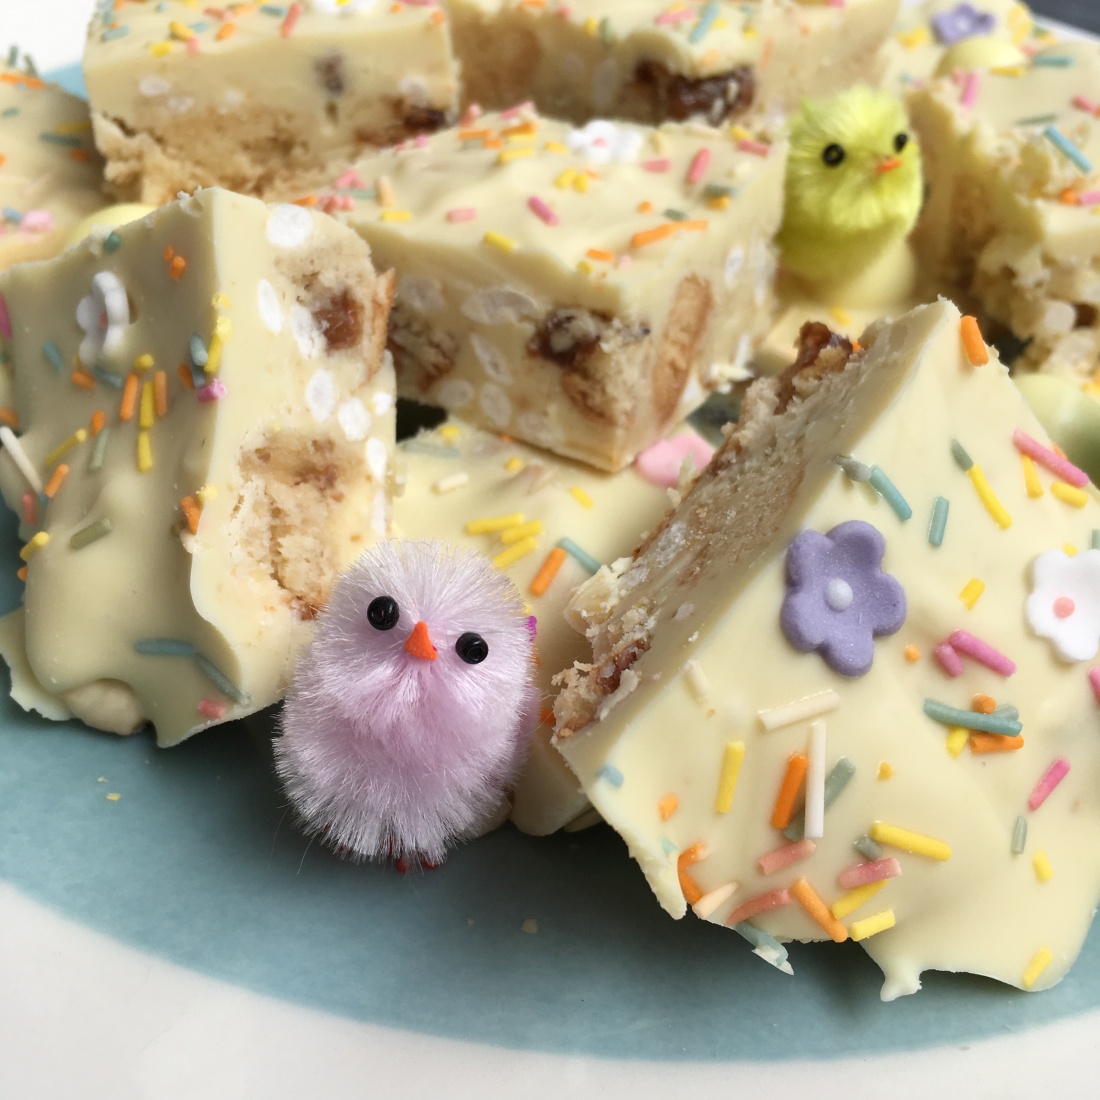
Now, sadly, I can’t eat cocoa or wheat (shredded or otherwise). I can, however, eat white chocolate, and I think the colour looks so bright and springlike.

Easter rocky road

The textures of this rocky road are provided by crispy puffed rice, chunks of crumbly shortbread, and cubes of hot cross bun. If you’re disappointed by the lack of marshmallows in this recipe, then by all means put some into yours.

This recipe is definitely for those with a sweet tooth, so I’d recommend cutting it into dainty cubes. This would be a nice project to do with children; they’ll be entranced by the melted chocolate, and they’ll love the mixing and decorating.

Easter rocky road white chocolate

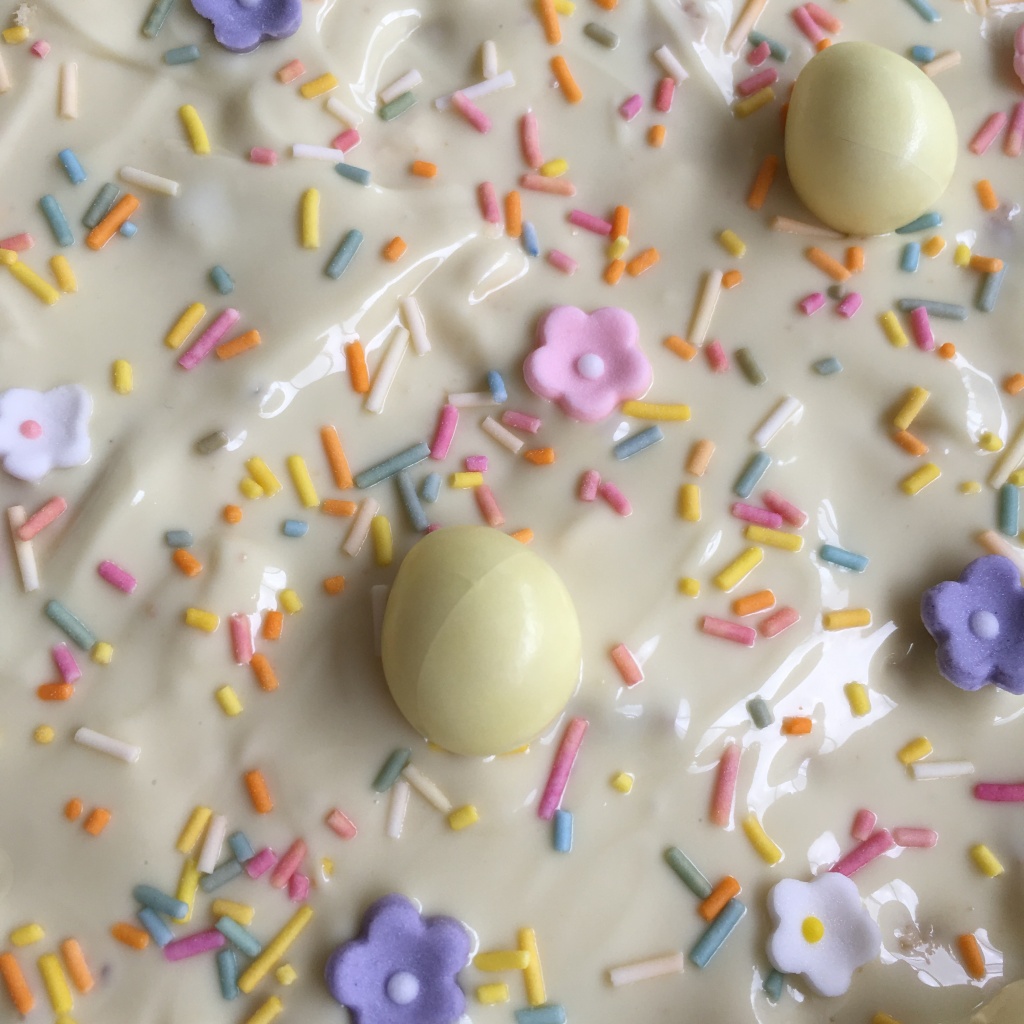
To decorate, I used pastel sugar sprinkles and white chocolate eggs. Feel free to deviate! The shops are full with so many gorgeous Easter treats to use.

This quick, no-bake treat is also suitable for freezing! Why not make some this weekend and freeze them, ready for the big day (If you can wait that long!)

Easter rocky road

Easter Rocky Road

1 gluten-free hot cross bun

100g gluten-free shortbread

15g gluten-free puffed rice

405g white chocolate

Decorations

  1. Cut the hot cross bun into small cubes and set aside.
  2. Cut the shortbread into big chunks.
  3. Measure out the rice and set aside.
  4. Break all the chocolate. Place two thirds of it into a bowl set over a pot of water. Gnetly heat the pot to melt the chocolate, making sure to stir and watch it carefully.
  5. Once the chocolate’s melted, add in the shortbread, rice and bun pieces. Stir to combine then press into a 20cm square pan (lined with baking paper).
  6. Melt the final third of the chocolate. This will be poured over the top of the rocky road to make the surface smoother.
  7. Once the chocolate has been poured and spread on top, the surface of the rocky road should look even and ready for decorating. Place your decorations on before the chocolate sets. When you’re happy, place in the fridge and leave to chill for about an hour.
  8. Once it’s set, cut into small chunks and enjoy!

‘Bar snack’ no-bake crispy treats

Sweet salty crispy no-bake treats

Like a lot of people, I love food that combines sweet and salty flavours. Sweet and salty popcorn, salted caramel, anything of that nature. But I’ve got to say, it’s hard to get right.

I’m sure we’ve all bought some salted caramel treat, for instance (chocolate, ice cream etc.) and thought…I can’t really taste the salt. That’s why I think it has to be added to desserts carefully, so that it can spark off the other flavours as intended. In my Salty Dog biscuits, for instance, the little sprinkling of salt on the top is a great foil to the citrus flavours of the biscuit.

Sweet salty crispy no-bake treats

For my latest bake (or non-bake), I decided to combine some salty snacks with a classic marshmallow crispy rice treat. I was worried that the texture of the treat would become homogenously crispy but no- the puffed rice has a little chew to it, the pretzels are crisp and the peanuts are chunky. The saltiness is located within the pretzels and peanuts, so that you get bursts of saltiness instead of an overall salty flavour.

Pretzel peanut rice crispy treat

I cut the treats into small chunks as I expected them to be sickly sweet, but they turned out milder than I expected. I used gluten-free puffed rice without any added sugar, so perhaps that’s why. If you like your treats sweeter then use sweetened puffed rice, or perhaps drizzle these with some melted chocolate.

Texturally, these treats are unique and moreish. I think they’d be great as an alternative snack for a movie night or a football game. As you can see, this recipe filled up two small pans; halve the recipe if needed.

Sweet salty pretzel peanut crispy treat

‘Bar snack’ crispy treats

200g marshmallows

1 and 1/2 tbsps butter

150g gluten-free puffed rice

100g salted peanuts

100g gluten-free pretzels

  1. Prepare two small pans with baking paper.
  2. Chop the pretzels (not too much).
  3. Melt the marshmallows with the butter over a medium heat until liquified.
  4. Add the marshmallow mixture to the other ingredients and stir well.
  5. Press into the pans and put into the fridge for a few hours. Once chilled, slice them into however many pieces you desire. A bit of oil on the knife might help, I used coconut oil.
  6. Keep them in the fridge or freeze them!

Orange + amaretto crepe cake

Orange and amaretto crepe cake

Shrove Tuesday, Mardi Gras, Pancake Day…whatever you call it, whatever your beliefs, I’m sure we can all agree it’s a day to look forward to. As the day approaches (March 5th this year!) I thought I’d try something new for me- a crepe cake!

Here in the UK we tend to make French-style thin, crispy crepes on pancake day. As a child I doused all mine in lemon juice and sugar. The whole process was pretty magical- as soon as my plate was empty another hot, golden pancake would be slid onto it. One year I insisted that we experiment with a savoury bolognese pancake which went quite well. Sometimes we would have smaller, softer, sweeter pancakes (we call these Scotch pancakes).

Orange and amaretto crepe cake

The big stacks of fluffy pancakes which the Americans ate (with a slab of butter- why??) weren’t really our style. Hopefully one day I’ll travel to the states and get myself a big stack of pancakes (gluten free, of course). Until then, I’ve decided to try my hand at at a crepe cake, or as the French call it, ‘mille crepe’, meaning ‘a thousand crepes’. I’ve seen crepe cakes all over the internet and wanted to give it a go for myself!

This cake features twenty gluten free crepes stacked together with a thin layer of sweetened cheese (ricotta and cream cheese) filling between each crepe, a fresh orange compote, orange slices and toasted almonds. The result is more sophisticated than I’d anticipated, with subtle sweet flavours. I also love the way the layers look once you cut into it.

Orange and amaretto crepe cake

This dessert is also a surprising amount of work! But so worth it if you want to impress brunch guests, or perhaps for the birthday of a pancake lover. It keeps cold but it’s a bother to move in and out of a tin, so I recommend making it for an occasion. It also slices a bit neater when chilled but you could serve it at room temperature. My advice would also be to serve the compote on the side and just put fresh orange segments and almonds on the top. If you can find amaretti biscuits, crumble them up for a nice crunchy addition.

Orange and amaretto crepe cake

Orange + amaretto crepe cake

For the crepes:

500g plain flour

4 eggs

1 litre milk

For the filling:

250g ricotta

100g cream cheese

125g icing sugar

Splash of almond liquer (use almond extract for a non-alcoholic alternative)

For the compote:

5 oranges (I used a mixture of blood oranges and regular oranges)

1 tbsp light brown sugar

1 tbsp almond liquer (or tsps almond extract)

For the topping:

One orange

Toasted flaked almonds

Amaretti biscuits

  1. Combine the crepe ingredients to make a smooth batter. It would be best to make the crepe batter in two batches.
  2. Heat a small non-stick frying pan (mine was 20cm across). Once the pan is hot, pour in enough batter to just cover the base of the pan. Let the pancake cook on one side until you see bubbles on the top. Lift up the edge of the pancake to check if it’s ready to flip; it should be golden and crispy. Flip it and cook the other side briefly until it has golden spots. Place the pancake on a plate and leave it to one side.
  3. Repeat the process with the rest of the batter, stacking the pancakes together on a plate (they won’t stick together, don’t worry!). I found that this amount of batter made just over twenty pancakes.
  4. Once your pancakes are ready you can begin on the compote. Segment the oranges into a saucepan. This is a great YouTube video which shows you exactly how to do it.  
  5. Add the sugar and liquer to the saucepan and bubble over medium-high heat until the orange segments have softened.
  6. Whisk the filling ingredients together. The mixture will become looser, but don’t fear.
  7. Place your first pancake down on your plate or cake stand. Spread a spoonful of your filling mixture over the pancake. Place another pancake on top and repeat.
  8. Once you’ve placed your final pancake on top, you can decorate with icing sugar, almonds, fresh orange segments, or even crushed amaretti biscuits if you wish. Serve the cake immediately.

Classic steamed pudding with marmalade + sultanas

Classic Steamed Pudding with Marmalade + Sultanas

Like many British children I turned to steamed sponges for warmth and comfort during the long winter months. I loved the chocolate puddings that my mum would give me at home, rich with sauce and humming with sweetness, but the stodgy syrup and jam sponges at school were just as welcome.

As I was discussing with my parents last night when we tucked into this particular pudding, the flavours and textures of a steamed pudding are what make it so distinctive and moreish. Technically, I use the same recipe for this pudding as I do for my baked sponges, but the steaming gives the sponge a unique, tender bite which distinguishes it from any other cake.

Classic Steamed Pudding with Marmalade + Sultanas

Warm sponges like these call for something sweet and sticky to top them. Traditionally jam or golden syrup is used. I still remember the excitement at school when syrup sponge was on the menu; it’s a total crowd pleaser. I suppose it’s the trifecta of sticky, soft and sweet which appeals to our inner child.

I was inspired to make this recipe when I spotted some marmalade with stem ginger in the supermarket sitting nearby a large bag of plump bronze sultanas. Nigella Lawson has a well-known baked marmalade pudding recipe which is a favourite in our house (we’ve made it many times over) and I suddenly had the idea to make a steamed pudding- something a little more grown up.

In the interests of being grown up this pudding has sultanas in, something which my younger self would baulk at. Feel free to omit them if you feel similarly, but I think they add a nice texture and compliment the bitter orange flavour of the marmalade. Also regarding texture, I think that marmalade with peel looks and tastes better than marmalade without peel, but this is a matter of preference.

Classic Steamed Pudding with Marmalade + Sultanas

Steamed puddings can be served with any number of sauces or sides: cream, custard, ice cream. We have some yoghurt lovers in our house who douse any and all cakes with it. The good thing about steamed puddings, however, is that they do tend to be moist, and can be eaten without accompaniment.

I hope that you give a steamed pudding a go this winter if you’ve never made one before. It’s actually very easy to do, though they take a bit of time to cook, and they don’t require any equipment which isn’t readily available. I got my cooking instructions from St Delia Smith, but this is my own recipe.

Gluten Free Steamed Pudding with Marmalade + Sultanas (serves eight)

Equipment required:

One large steamer

One ceramic pudding bowl (2 pints or 1 and 1/4 litres)

Aluminium foil

String

Ingredients:

170g GF self raising flour

110g light muscovado sugar

170g butter

3 eggs

Two handfuls sultanas

1 tsp vanilla extract

1 tsp ginger

1 tsp cinnamon

2 tbsp marmalade

  1. Prepare your steamer.
  2. Grease the inside of the pudding bowl well. Place the marmalade into the bowl and smooth it so that it covers the base of the bowl in an even layer.
  3. Combine the butter and sugar with an electric mixer until smooth.
  4. Add the rest of the ingredients and mix until smooth.
  5. Pour the mixture into the pudding bowl and smooth it out.
  6. Cut two pieces of aluminium foil large enough to cover the top of the pudding bowl and place them on top of one another. create a ‘pleat’ or ‘fold’ along the middle of the foil (this allows for expansion). I’ve inserted pictures below this recipe to help.
  7. Place the pleated foil on top of the pudding bowl and tie it to the bowl with string. You can create a loop with the string to make it easier to remove the pudding bowl from the steamer when the pudding is ready.
  8. Place the pudding bowl in the steamer and steam for an hour and a half.
  9. Once the steaming time is over, remove the lid from the steamer and allow to cool for a minute before removing the pudding bowl. Cut the string, remove the foil and flip the pudding onto your serving dish in the same way you would make a sandcastle. Serve immediately.
Foil pleat
Pleating the foil like this allows for the sponge to expand
Steamed pudding
Use normal string to hold the foil in place (I couldn’t find my string)

Vegan date and chocolate flapjacks

In all truthfulness, this is not the recipe which I hoped to share today.

I’ve been thinking for a while about doing a vegan recipe. I had a can of pumpkin puree in the cupboard which I bought on a whim, and I thought I would try to do something with that. I planned to make nutty pumpkin muffins with a molten date caramel core. The batter looked promising, but the final results were disappointing (I’m not even sure they were edible).

Vegan date and chocolate flapjack

It was time to come up with a plan B. I had about half the date caramel left (which was really more of a date paste). I also realised that I had some dairy free chocolate chips in the cupboard. The thought struck me: flapjack. Cake can go wrong in so many ways, especially when you attempt to make it vegan and gluten free. But flapjack? Making a flapjack vegan requires one simple substitution (dairy-free spread instead of butter). This can’t go wrong.

Vegan date and chocolate flapjack

Sure enough, the flapjacks turned out well! Sticky, golden and toothsome, with a sweet layer of chocolate and date paste in the middle. Who said vegans have to live off celery sticks and hummus?

Vegan Chocolate and Date flapjack:

150g dates

1 tbsp almond butter

Almond milk

Vanilla extract

50g dairy-free chocolate chips (I used a mix of white and milk chocolate)

500g pure oats

8 tbsps golden syrup

200g light muscovado sugar

250g dairy-free spread

  1. Preheat the oven to 180 degrees and line a deep pan with baking paper.
  2. Combine the dates with the almond butter, vanilla extract and a pinch of salt in a food processor. Add splashes of almond milk until you have a paste.
  3. Melt the spread, golden syrup and sugar together, then add them to the oats and stir to combine.
  4. Place half the oat mixture into the bottom of the pan in an even layer. Then spread the date paste on top of this layer.
  5. Scatter the chocolate chips over the date paste layer. Then place the rest of the oats on top.
  6. Bake for half an hour until golden, then leave to cool completely before slicing.

BONUS RECIPE: Christmas 75 cocktail!

As I hosted a bake-off screening with some friends this year (naturally I’m obsessed) I decided to do cocktails.  Whilst seeking inspiration online I found a recipe for a French 75.

At its most basic level, a French 75 contains gin, lemon juice and sugar or sugar syrup, topped up with something fizzy.  However, recipes vary, and some contain Cointreau, an orange liqueur. 

The Christmas 75 cocktail

When my friends and I tasted the budget student version which I threw together (Cointreau, bog standard gin, a spoonful of sugar and tonic water) we were delighted!  It was sweet but drinkable, and felt a bit fancier than what we were used to. 

Recently we got a bottle of spiced clementine gin into the house.  I was worried that it would be a bit naff, an overly-sweet Christmas gimmick.  But I was pleasantly surprised at the fresh taste of the clementine and the subtle spices.  It wasn’t long before I got the idea to add it to my new favourite cocktail.

This is the result!  I call it a Christmas 75.  It’s indulgent and fun, though Prosecco purists won’t be happy.  Mind how you go with these, they’re powerful (and if you’d like to experiment with the Cointreau, why not try my winter spice cake with Cointreau icing?). 

Christmas 75 cocktail and winter spice cake

Christmas 75:  

Spiced clementine gin

Cointreau

Fizz (I used prosecco, tonic water works well for a lighter drink with a bitter edge)

Candied peel and chocolate coins to garnish (optional)

  1. I’m not one to measure exactly I’m afraid, so this isn’t much of a recipe.  I added two teaspoons of candied, chopped mixed peel to a champagne flute and poured enough gin to cover. 
  2. Then I added a splash of Cointreau (roughly two parts gin to one part Cointreau).
  3. Then I topped up with Prosecco.
  4. The chocolate coin garnish is tricky, but not impossible (I would not recommend it if you’re hosting a massive party).  Unwrap your choice of chocolate coin (not too small) and place it on a chopping board. 
  5. You then have to heat a small knife.  I tried a few different methods; soaking the knife in hot water and holding it over a toaster worked the best, as matches can produce a sort of sooty residue.
  6. After a few seconds of heating, place the knife on the coin.  You are attempting to melt a slit into the coin so that you may slot it over the side of the glass.  The coins are prone to shattering so make sure you do not try to make the slit too long, it should not quite reach the centre of the coin.  
  7. Repeat the process, heating the knife and gently slicing through the coin.  Eventually you should have a slit which will fit onto the side of a glass.  By that time you will need a drink.  Cheers!
Chocolate coin cocktail garnish