Banana + pecan cake with treacle frosting

Banana pecan cake with treacle frosting

I really hope you readers like this recipe. I hope you like all my recipes, of course, or most of them. But I really hope that some of you like this one, because this has been by far my most contentious bake.

My darling mum, the woman who taught me to bake, was driven to distraction this morning. The sight of the baking equipment next to three oven-blackened bananas…the scene was set, and she didn’t like it one bit.

“But I don’t like bananas!” she mock-sobbed.

Unfortunately for her, I love bananas, and I’d been planning to bake with them for a while. I can’t always stick to ingredients that she likes, as I reminded her.

“I always make stuff you like!” Mum pouted.

This I couldn’t deny. Every birthday without fail my sister and I would choose some enormous multicoloured challenge from a kid’s birthday cake book (which we still have) and she would do it, without complaint.

Banana pecan cake with treacle frosting

This particular cake isn’t an enormous challenge, and it isn’t multicoloured either: it’s a festival of brown. Brown doesn’t necessarily mean boring, in fact right now it’s THE colour to wear. Match your cake to your outfit, and thank me later.

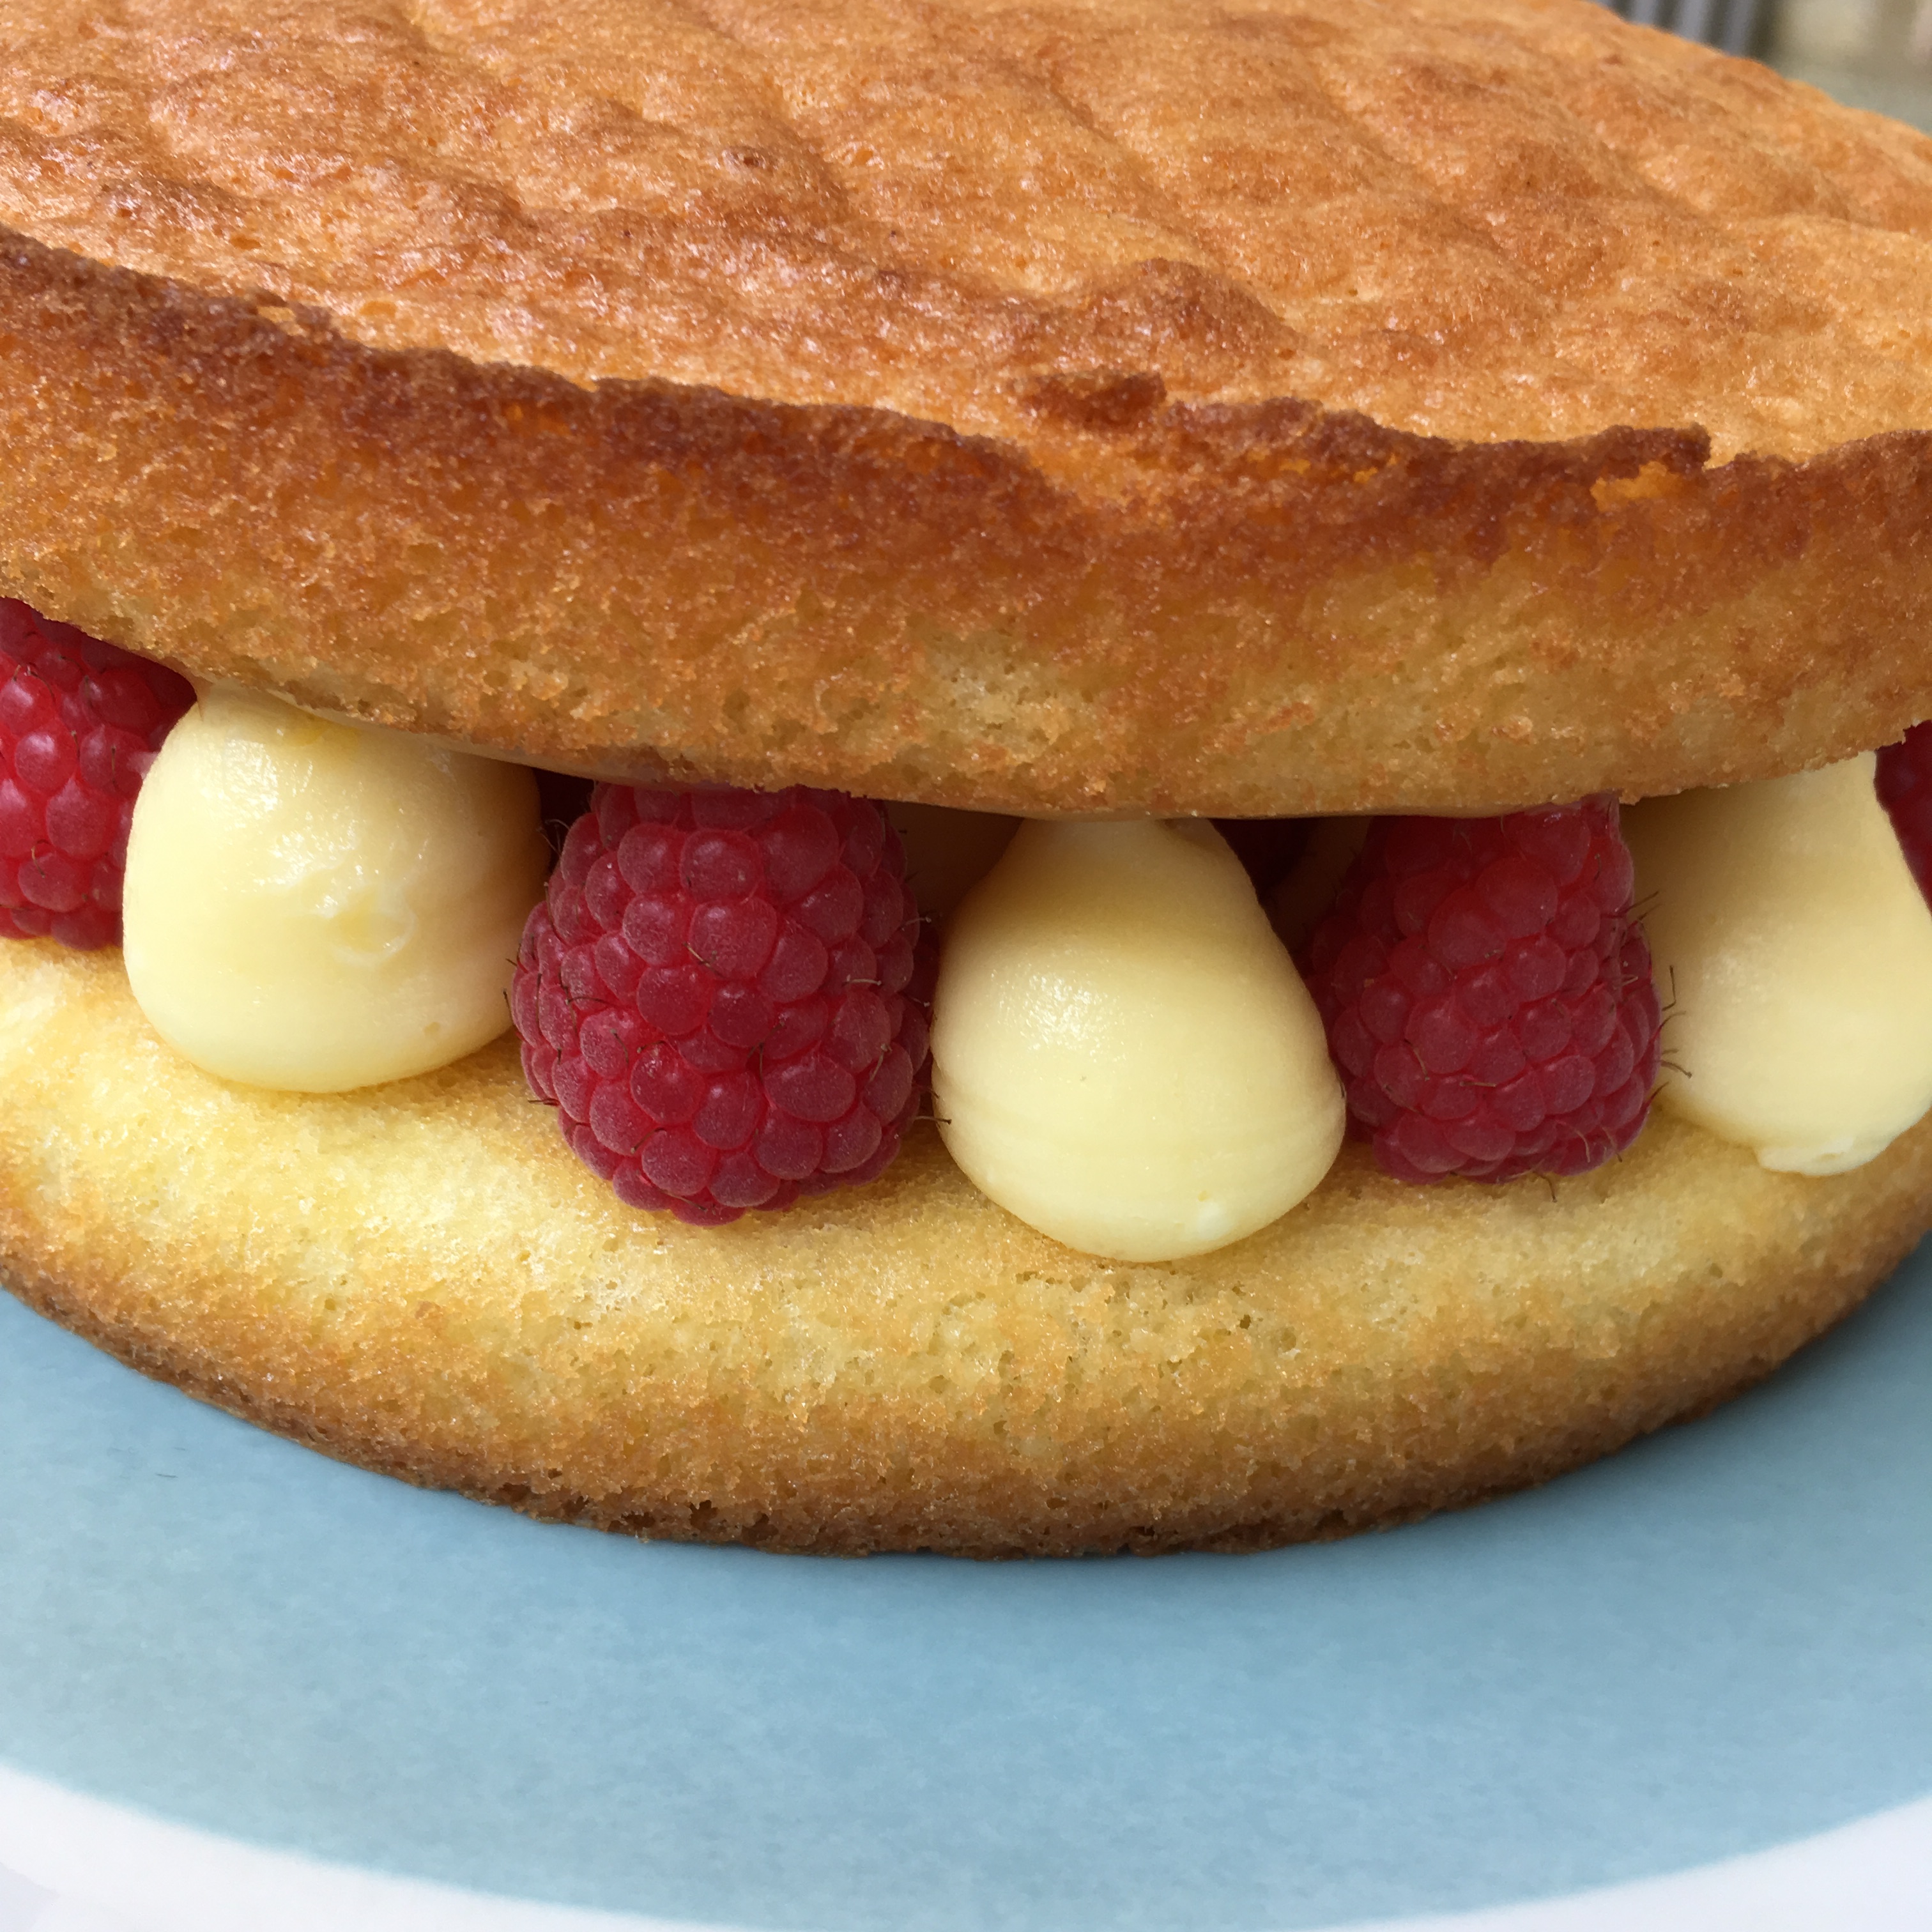
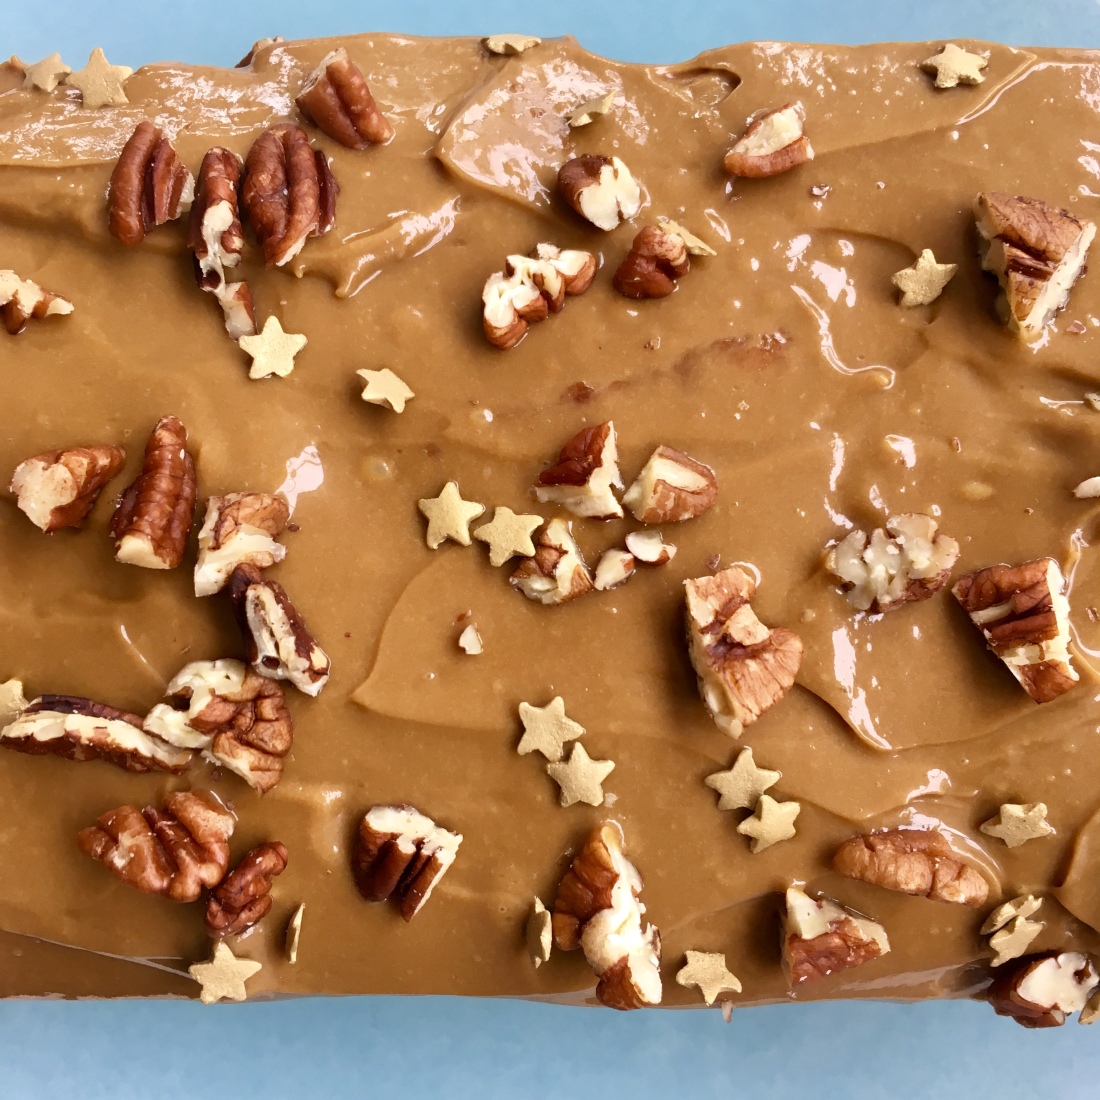
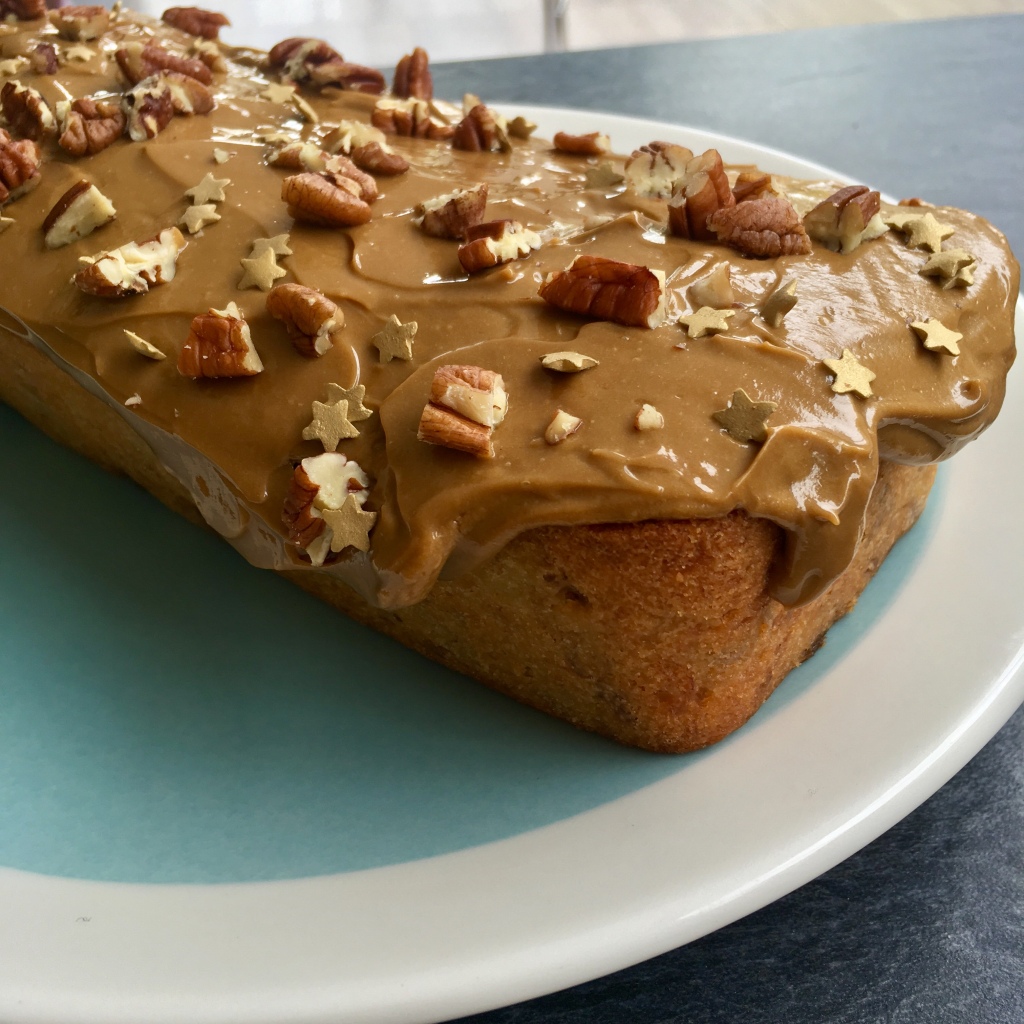
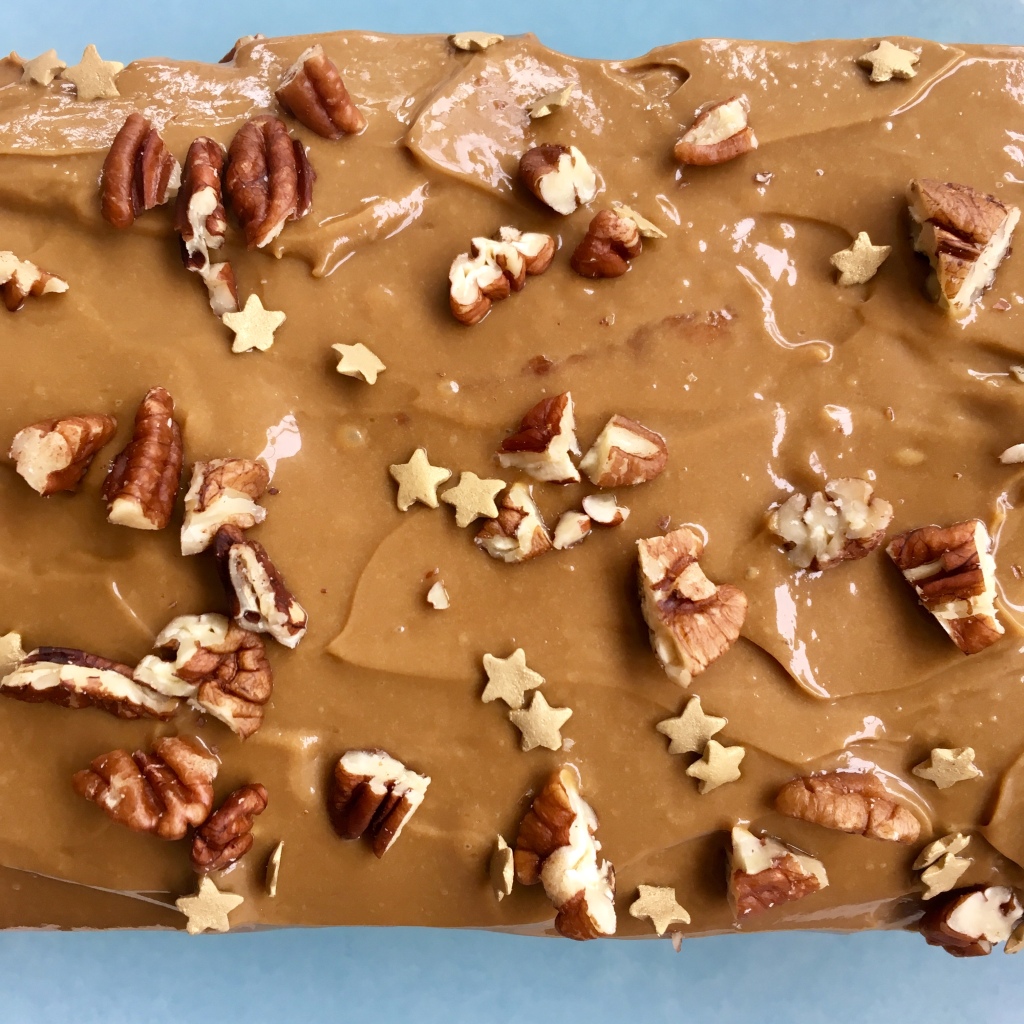
What this cake lacks in colour it makes up for in flavour and texture. Banana gives a cake a tender springy texture, and I think it’s ideal for gluten-free baking. The crunchy pecans throughout add interest, but for me the star is the treacle ‘frosting’. Treacle is added to cream cheese and very lightly sweetened. It makes for a creamy result, and the lactic sourness of the cream cheese really lifts the rich treacle.

Mum won’t go near this cake, but I’m happy with the result. And I hope, reader, that you are too.

Banana pecan cake with treacle frosting

Banana + pecan cake with treacle frosting

For the cake:

170g gluten-free self-raising flour

3 bananas

90g light brown sugar

110g butter

55g coconut oil

2 eggs

1 tsp vanilla

Dash of milk

100g pecans

For the frosting:

180g cream cheese

1 tbsp treacle

75g icing sugar

  1. If your bananas aren’t ripe, preheat your oven to 160 degrees and line a tray with baking paper. Place the whole bananas on the tray and cook for about fifteen minutes or until the bananas are completely black. Remove them from the oven and leave to cool for a few minutes before handling.
  2. Chop the pecans and reserve a few for decoration.
  3. Place all the cake ingredients in a bowl and mix until combined.
  4. Pour into a loaf tin (I used a silicone one, if yours isn’t silicone you may want to grease and/or line it) and bake at 160 for about 40 minutes.
  5. Loaf cakes take a long time to cook and a long time to cool down, so be patient. While you leave your cake to cool make the frosting by combining the ingredients until smooth. The consistency of the frosting is spreadable, not pipeable. Place it into the fridge to chill while your cake cools completely.
  6. When the cake is cool, spread the chilled frosting on the top and decorate. You can use more chopped pecans, chocolate, or any sort of sprinkle. Enjoy!

‘Death By Gin’ Mother’s day cake

'Death by gin' mother's day cake

I don’t know about you, but I’m starting to get a bit fed up with the cutesy mother’s day stuff. It all seems a bit too pink and schmaltzy. A bit impersonal. All too often, our gratitude towards our mothers is boiled down to a bunch of flowers, or a cake that looks like a bunch of flowers.

Don’t get me wrong, I love flowers (and so does my mum), and flowery cakes are lovely, but I wanted to personalise my cake to her. The spirit of the moment – gin- has always been my mum’s favourite (and, thankfully, not her ruin). This fact is so well known that she received three or four separate bottles for Christmas, much to her embarrassment (and delight).

'Death by gin' mother's day cake

Gin is a flavoursome and versatile spirit which is being increasingly used in baking. When coming up with my idea for this cake I researched popular gin botanicals. The possibilities are almost endless, but I decided to pick a few to create a sophisticated and harmonious flavour palate.

The cake itself is almond-based, which gives it a soft texture and subtle sweet flavour. To this I added a little gin and some cinnamon for some warmth. The cake was then soaked in a citrus-cardamom syrup (with some gin and tonic added) and topped with a gin icing and homemade candied citrus peels. I also got some gin gummy sweets from Lakeland, I popped one right in the centre of the cake.

'Death by gin' mother's day cake

I’d never candied anything before, but the process was fairly easy! The resulting peel tastes fresher and looks more vibrant than any that you buy at the shop, and can be used in so many ways. I candied limes, lemons, grapefruit and oranges. Limes worked well in slices, round or cut into halves. I hoped to create slices of the other fruits too, but that didn’t quite work out. I found that the orange slices didn’t dry out well, the flesh of the lemon slices disintegrated in the candying process, and the pith of the grapefruit was too large. I kept the peel of these three, however, and used it. You can keep it in a ring, cut it into strips, or cut it small to create a confetti effect.

Candied citrus

I did two rounds of candying. After the first round I had a citrus-infused syrup left over, a light amber colour and slightly jellied from the pectin of the fruits. I decided to use this syrup again for my second round of candying, after which it was even more intense. I saved the syrup again and, after a few additions, it was the perfect thing to drizzle over the cake. In retrospect, I was so enthusiastic about this syrup that the cake ended up a bit soggy.

The final result is a cake which feels grown up. There’s enough sugar to balance out the bitterness from the gin and the citrus, there’s sharpness and a bit of spice from the cinnamon and cardamom. This is definitely a must-bake for any gin lovers out there.

'Death by gin' mother's day cake

‘Death By Gin’ Mother’s day cake

For the candied peel:

250g caster sugar

1 lime

1 grapefruit (I used one with a pale green skin)

1 lemon

1 orange

For the cake:

140g ground almonds

85g gluten-free self-raising flour

170g caster sugar

225g butter

4 eggs

1 tsp baking powder

1 tsp cinnamon

1 tbsp gin

For the syrup:

125ml tonic water

60ml gin

6 cardamom pods

For the icing:

200g icing sugar

Gin

  1. First, make the candied fruit. This should be done a day in advance to allow the peel to dry out fully, but you can also dry the fruit in an oven on a low temperature. Wash and slice the fruit into thin slices.
  2. Combine the caster sugar with 250ml of water and heat until the sugar has dissolved and the mixture is bubbling. Drop in half the fruit and lower the heat to a simmer.
  3. Gently stir and turn the fruit every so often, cooking for 20-30 minutes or until the fruit is tender and translucent. If any slices fall apart you can still use the peel.
  4. Bring the fruit out of the pot and place it on a cooling rack to drain. Reserve the syrup. You can either dry it out like this overnight or you can place them on a baking sheet and cook them at a low temperature (I used 75 degrees) for about half an hour. I used a combination of both methods.
  5. Candy the other half of the fruit in the same manner and reserve the syrup. Once the peel is dry dust it lightly with more caster sugar.
  6. To make the cake, preheat your oven to 180 degrees. I used a medium-sized round spring-form tin for this cake. I greased the sides and placed baking paper at the bottom.
  7. Combine all the ingredients together in a bowl until the mixture is pale and fluffy. Add to the tin and bake for about forty minutes, until an inserted toothpick comes out clean. My cake browned a lot so I put some tin foil over it halfway through cooking.
  8. Whilst the cake is cooking prepare the syrup. Add the candying syrup to a pot along with the gin, tonic, and the seeds from the cardamom pods. Heat and stir to combine. Allow the syrup to bubble and reduce for about ten minutes, then turn off the heat and strain the syrup into a jug.
  9. Remove the cake from the oven and leave to cool slightly. Use a toothpick to poke holes in the cake and pour in some of the syrup. You won’t need all of the syrup, but the rest can be reserved for any number of uses.
  10. Leave the cake to cool completely. Once it has, make a thick icing from the icing sugar and some gin. Pour it over the cake, and arrange your candied fruit as desired.

Orange + amaretto crepe cake

Orange and amaretto crepe cake

Shrove Tuesday, Mardi Gras, Pancake Day…whatever you call it, whatever your beliefs, I’m sure we can all agree it’s a day to look forward to. As the day approaches (March 5th this year!) I thought I’d try something new for me- a crepe cake!

Here in the UK we tend to make French-style thin, crispy crepes on pancake day. As a child I doused all mine in lemon juice and sugar. The whole process was pretty magical- as soon as my plate was empty another hot, golden pancake would be slid onto it. One year I insisted that we experiment with a savoury bolognese pancake which went quite well. Sometimes we would have smaller, softer, sweeter pancakes (we call these Scotch pancakes).

Orange and amaretto crepe cake

The big stacks of fluffy pancakes which the Americans ate (with a slab of butter- why??) weren’t really our style. Hopefully one day I’ll travel to the states and get myself a big stack of pancakes (gluten free, of course). Until then, I’ve decided to try my hand at at a crepe cake, or as the French call it, ‘mille crepe’, meaning ‘a thousand crepes’. I’ve seen crepe cakes all over the internet and wanted to give it a go for myself!

This cake features twenty gluten free crepes stacked together with a thin layer of sweetened cheese (ricotta and cream cheese) filling between each crepe, a fresh orange compote, orange slices and toasted almonds. The result is more sophisticated than I’d anticipated, with subtle sweet flavours. I also love the way the layers look once you cut into it.

Orange and amaretto crepe cake

This dessert is also a surprising amount of work! But so worth it if you want to impress brunch guests, or perhaps for the birthday of a pancake lover. It keeps cold but it’s a bother to move in and out of a tin, so I recommend making it for an occasion. It also slices a bit neater when chilled but you could serve it at room temperature. My advice would also be to serve the compote on the side and just put fresh orange segments and almonds on the top. If you can find amaretti biscuits, crumble them up for a nice crunchy addition.

Orange and amaretto crepe cake

Orange + amaretto crepe cake

For the crepes:

500g plain flour

4 eggs

1 litre milk

For the filling:

250g ricotta

100g cream cheese

125g icing sugar

Splash of almond liquer (use almond extract for a non-alcoholic alternative)

For the compote:

5 oranges (I used a mixture of blood oranges and regular oranges)

1 tbsp light brown sugar

1 tbsp almond liquer (or tsps almond extract)

For the topping:

One orange

Toasted flaked almonds

Amaretti biscuits

  1. Combine the crepe ingredients to make a smooth batter. It would be best to make the crepe batter in two batches.
  2. Heat a small non-stick frying pan (mine was 20cm across). Once the pan is hot, pour in enough batter to just cover the base of the pan. Let the pancake cook on one side until you see bubbles on the top. Lift up the edge of the pancake to check if it’s ready to flip; it should be golden and crispy. Flip it and cook the other side briefly until it has golden spots. Place the pancake on a plate and leave it to one side.
  3. Repeat the process with the rest of the batter, stacking the pancakes together on a plate (they won’t stick together, don’t worry!). I found that this amount of batter made just over twenty pancakes.
  4. Once your pancakes are ready you can begin on the compote. Segment the oranges into a saucepan. This is a great YouTube video which shows you exactly how to do it.  
  5. Add the sugar and liquer to the saucepan and bubble over medium-high heat until the orange segments have softened.
  6. Whisk the filling ingredients together. The mixture will become looser, but don’t fear.
  7. Place your first pancake down on your plate or cake stand. Spread a spoonful of your filling mixture over the pancake. Place another pancake on top and repeat.
  8. Once you’ve placed your final pancake on top, you can decorate with icing sugar, almonds, fresh orange segments, or even crushed amaretti biscuits if you wish. Serve the cake immediately.

Lemon + raspberry layer cake

Lemon and raspberry cake

February is the shortest month of the year, and for me it’s often the busiest. All the members of my family (except me) have birthdays within two weeks of February, so I spend quite a bit of time planning and making birthday treats.

The thing that truly gets us through February, however, is the promise that it will end soon and spring will appear. My mum feels this very strongly. When I was a child I used to scoff a bit as she waxed lyrical about the blossoming trees on the way to school, and a houseful of daffodils at Christmas time is not to everyone’s taste. I’m sorry for chuckling, mum (I know you’re reading this).

Lemon and raspberry cake

At the risk of sounding like an episode of Call The Midwife, there’s a real joy in the promise of a new year. Waking up to find sunlight on the other side of your curtains instead of darkness- that’s progress. The possibility of eating and drinking outside, even if you’re swaddled in a blanket as you do it. I appreciate all the seasons in their own way, but there’s something particularly nice about spring.

This is why I decided to celebrate the (hopefully imminent) arrival of spring in my mum’s birthday cake this year, using some of her favourite flavours. She loves the freshness of lemons and raspberries, and I think they’re both tart enough to pair nicely in a sweet layer cake with buttercream icing. The colours are also gorgeous and bold.

Lemon and raspberry cake

I decorated the cake with wafer daisies, fresh strawberries cut into fans, and macarons sandwiched with lemon curd. The macarons didn’t turn out exactly as I intended- I didn’t give them enough drying time so they cracked in the oven and didn’t form pieds (the frills on the bottom of the macaron). I decided to use them anyway, because they taste perfectly fine, and once they were dusted with a bit of icing sugar they looked quite nice.

Lemon and raspberry birthday cake

Lemon + raspberry layer cake

170g Gluten free self-raising flour

55g ground almonds

225g softened butter

170g white caster sugar

4 eggs

Zest of one lemon

Filling

One punnet of raspberries (around 225g)

250g softened butter

Icing sugar

Lemon curd (about 2 tbsp)

  1. Preheat your oven to 180 degrees fan. Grease two sandwich cake tins and line the base with a circle of baking paper.
  2. Combine the butter and sugar in a large bowl until pale and fluffy. Add the rest of the cake ingredients and stir to combine.
  3. Divide the cake batter evenly between the two tins and bake for about fifteen minutes until golden, and an inserted toothpick comes out clean. Remove the sponges and leave to cool.
  4. I don’t tend to weigh icing sugar when making buttercream icing, I judge it by eye and taste. First cream the butter, then add the sugar gradually until the icing tastes sweet enough for you. You can add other flavours, like vanilla, or leave it plain.
  5. Place the icing into a piping bag with a round nozzle tip. Gently wash and dry the raspberries. Pipe a blob of icing and place a raspberry next to it. Continue around the perimeter of the cake and then work inwards, doing concentric circles of alternate raspberries and icing blobs.
  6. When that layer is complete, spread some lemon curd on the other sponge and flip it on top of the bottom layer.
  7. Decorate your sponge as you like!

Apricot and Ginger surprise cake (dairy + gluten free)

I think it’s best to start this post by wishing you all a happy new year! I know that for most of us our new year’s celebrations were held two weeks ago (been there, drank the fizz, got the hangover) but this year I’m celebrating new year twice: I’m celebrating Chinese new year for the first time!

My boyfriend’s family is from Hong Kong, and it just so happens that his aunt’s birthday coincides with Chinese new year this time (February 5th). It’s a big birthday too. When my boyfriend’s mum suggested that I might like to make a cake, naturally I leapt at the chance.

When I first met her, the aunt in question kindly gave me a money packet. As soon as I started dreaming up this cake I knew that I would incorporate some element of the money packet design as decoration. Then I got another idea. I’d seen surprise cakes online- a cavity is made in the cake which is filled with treats- but I’d never made one. Since money is traditionally given at Chinese new year, why not fill the cake with chocolate coins? Luckily they’re still in the shops (and available online) after Christmas, and heavily discounted!

In terms of flavours, I knew that this aunt liked Victoria sponge, but I wanted to play with the flavours a bit more. I had a new bottle of ginger extract which I was dying to try, and I decided that apricot jam would be a good pairing. Thus, the whole cake was formed in my head: the flavours (plain sponge, sandwiched with apricot jam and ginger buttercream), the decoration (buttercream flowers, inspired by the money packet) and the surprise (chocolate coins hidden inside).

I learnt how to do the buttercream flowers from a few different YouTube videos- Cupcake Savvy’s Kitchen, Greggy Soriano from Greggy’s Digest, and Joni Kwan from How to Cake it Step by Step. I used a set of plastic palette knives which I found from my local art shop, but I’m sure you can find similar ones online. I love the effect, I think it’s very beautiful and soft, and I can’t wait to play around with it more in the future!

What you see in this post is the trial of this cake, and it involved a lot of techniques which I had never done before. This meant that the assembly and decoration of this cake was a long and messy process. It was definitely worth it when I cut into that first slice and saw the coins spilling out just as I’d hoped.

The texture of this sponge is so light and fluffy, as well as the icing. The ginger extract gives a sweet heat to it and compliments the apricot nicely. This is definitely an interesting take on the Victoria sponge, and it’s worth trying out even if you’re a purist. Now all that’s left for me is to do it all again- hopefully with less mess this time. Wish me luck!

Apricot and Ginger Surprise cake: (gluten free + dairy free)

340g plain flour

225g caster sugar

340g dairy-free spread

6 eggs

2 tsp baking powder

2 tsp vanilla

For the decoration:

450g dairy-free spread

260g icing sugar

2 tsp ginger extract

Food colourings

300g apricot jam

About 15 chocolate coins

Tube of black writing icing/sprinkles/edible pearls (for the middle of the flowers)

  1. Preheat the oven to 180 degrees and line two sandwich cake tins.
  2. NOTE: The ingredients which I have listed are enough for the four individual cakes which make up this whole cake. I made these in two batches of two as I only have two sandwich cake tins.
  3. Cream the spread with the sugar until pale and fluffy, then add the other ingredients and combine well.
  4. Divide the mixture between the tins and bake for fifteen minutes or until the cakes shrink from the edges of the tin. They should be a light golden brown and an inserted toothpick should emerge clean.
  5. Leave the cakes to cool.
  6. Once you have baked all your cakes and they are all cool, start making your icing. To do this, simply combine the icing sugar with the spread and the ginger extract until pale and fluffy.
  7. Divide your buttercream equally into bowls and colour them as you desire, reserving some white icing to cover the whole cake.
  8. Place your first layer of cake down and cover it with first a layer of apricot jam, then some coloured buttercream.
  9. Use something round (I used a large round biscuit cutter) to cut a hole from the middle of two of the sponges (You can reserve these to make a small cake later).
  10. Place one of these sponges on top of the first layer you decorated. Add jam and buttercream, then place the other ring cake on top (So far your creation has a complete layer on the bottom, with the two ‘ring’ layers stacked on top, with jam and coloured buttercream between each layer).
  11. Take your chocolate coins, still in foil, and place them vertically into the hollow in the middle of your cake. Once you have enough in there they should stand up on their own.
  12. Place your final, complete layer on top of your cake, then cover the whole thing lightly in white buttercream.
  13. Use your palette knives and your coloured buttercream to create flowers on top. I used black writing icing to create dots in the centres of the flowers, but you could use sprinkles or edible pearls. I used the last scraps of coloured icing to create a watercolour effect around the sides of the cake.

Winter spice cake with Cointreau icing

Like a lot of people I’m not a bit fan of traditional British Christmas cake, pudding, and mince pies.  They’re just not really to my taste, so a few years ago I made a lightly spiced sponge cake in a bundt tin, and iced it with a drizzle of white water icing and some shiny gold sprinkles.  It was simple but festive, a nice antidote to the sickly stickiness of the dried fruit which dominates at this time of year.  Great for children and adults, I decided that I would definitely make this cake again for future Christmases.  

Winter spice cake with Cointreau icing

It’s the perfect cake to have when people drop by; it’s light and festive, and can be customised as you please.  Although it’s gluten free this cake doesn’t crumble to dust on impact, but remains lovely  and spongey.  The warm spices gently unfurl as you’re eating the cake, and the toppings provide crunch and chew.  I think that any decoration on a bake should be pleasant both to look at and to eat.  Dried rose petals, for instance, look divine but become pot pourri in the mouth.  

Winter spice cake with Cointreau icing

 This time I decided to add Cointreau (an orange liqueur) to the icing.  I feel like Cointreau is one of those old-school drinks which comes out at Christmastime, and I wanted to provide some inspiration of what to do with it if you stumble upon a bottle (you can also make my Christmas 75 cocktail, recipe on the blog!).  If you’re making this cake for children or non-drinkers then feel free to replace the Cointreau with fresh orange juice or orange extract and water.

Christmas 75 cocktail and winter spice cake

Winter Spice cake with Cointreau Icing:

175g gluten-free self-raising flour

175g butter

115g caster sugar

3 eggs

1 tsp vanilla extract

1tsp almond extract (optional)

2 tsp cinnamon

2 tsp ground ginger

1 tsp ground nutmeg

100g icing sugar

Cointreau or orange juice or orange extract

Toppings of your choice (dried fruit, nuts, sprinkles etc)

  1. Preheat the oven to 180 degrees and butter a bundt tin.  
  2. Cream the butter with the sugar until pale and fluffy.
  3. Add the rest of the ingredients and mix together well.
  4. When the mixture is well combined place it in the bundt tin evenly and smooth the top.  Try to ensure that the mixture looks level all around. 
  5. Bake for about twenty minutes until the cake is golden and an inserted toothpick comes out clean.  Leave the cake to cool.
  6. Once the cake is cool place a plate or board on top and flip the plate/board and cake tin upside down.  Your cake might not come out straight away; I went around the edge of mine with a dinner knife a few times first. 
  7. Once the cake is out you can prepare your icing.  Pour the icing sugar into the bowl and gradually add your liquid (Cointreau, juice, water) bit by bit, stirring well, until you have a thick, opaque icing which drips easily from the spoon.  If you’re using Cointreau you may think the icing tastes strong, but once it’s on the cake it tastes fine.
  8. Decorate your cake as you please.  Enjoy!